Azure: SQL Servers and Data

By: Zarek Bowen - Principal Consultant
Published:
October 29, 2020
One of Azure’s many assets available is the use of cloud-based SQL servers- something many would deem a necessity for any entity dealing with large amounts of data. The benefit of using cloud-based SQL servers is gaining access to the immense storage capacity of the cloud while also having the capabilities and access of any other platform. The connection is a similar process and can be done with any client, such as Microsoft SQL Server Management Studio, or Microsoft’s Visual Studio, where queries can be made to add, edit or manipulate data however SQL allows.
At CloudADDIE, setting up Azure SQL Servers was a step in a larger, overarching process to integrate a cloud database (or on-prem database) with Oracle’s EPM applications using the EPM Agent. In this tutorial, we will walk through the process of setting up a SQL database in Microsoft Azure and making the connection to the SQL server. If you would like to know more about this process, follow our series as we continue to explore Azure, SQL Databases & Servers, and EPM Agent. Links to related documentation are included at end of this tutorial.
Setup is simple with a subscription to Microsoft Azure. Navigate to the Azure portal, portal.azure.com, then find the SQL server icon listed among their services at the top of the page. Once on the page, click the “+” button that says Add and it will take you to the page to create your database.


Parameters are listed for your new database. Name your database, choose your settings and select the storage size, then select “Review + Create.” Now, you have a database on the cloud, and the next step is accessing it.
As aforementioned, connecting is as familiar as with any other database and any client will work. But first, certain settings need to be established within your portal. On the page with your new database, find the firewall settings and it should appear as below:

Azure’s security needs to be made aware of who can access your server/database, so within these firewall settings you must add your IP address. There is a button already built in to add your current IP, or one can be manually added then saved below in the case another IP is being used to access the database.


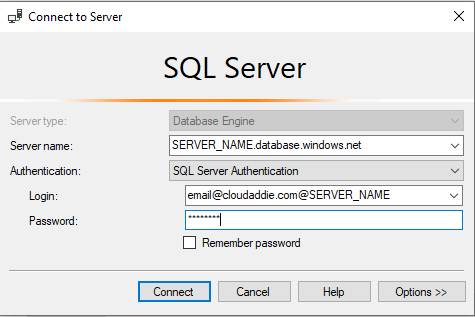
Now, a connection can be established between your machine and the database. Open your client of choice, (in our example MSSMS) and navigate to establish a connection. The data form should be filled as follows:

A variable “SERVER_NAME” appears where your server name should go. This is what you named your server earlier during creation, and without the appending of it on your login, you will not be able to access it.
Choose Connect and, assuming everything was done correctly, you should be connected to your SQL server. Do some independent testing and simple queries to create a table and fill it. As you do these tests, the data you input will be stored in the cloud. Our next step is importing data, which can be done in a multitude of ways via scripting, queries, or a simple import using a flat file.
For those not well versed in SQL or manipulating data within it, you can start with resources here; and anyone interested in following our process to integrate this database with Oracle can find more information here.
If you have any additional questions or would like to know more
about how we can help you, feel free to contact us at:
bd@cloudaddie.com or
832-396-7583
FREE CONSULTATION
Schedule your Free Consultation, to see it in action!
Contact Us!
We offer Autonomous Systems for EPM Cloud Applications such as Oracle Planning & Budgeting Cloud Service (PBCS/EPBCS), Financial Close & Consolidations Cloud Service (FCCS), Enterprise Data Management Cloud Services (EDMCS), Account Reconciliation Cloud Service (ARCS), Profitability & Cost Management (PCM) and more.